You installed a new garbage disposal. Everything works — the disposal runs, the sink drains fine. Then you run the dishwasher and it finishes with three inches of water sitting in the bottom.
Nothing is broken. There’s a solid plastic disc inside your new disposal that nobody removed, and it’s sealing off the dishwasher connection completely.
This is the single most common cause of a dishwasher that stops draining right after a disposal swap, and it catches homeowners and professional installers alike. Ten minutes and a blunt flathead screwdriver fixes it — no parts, no service call, nothing to order.
Why the Plug Is There
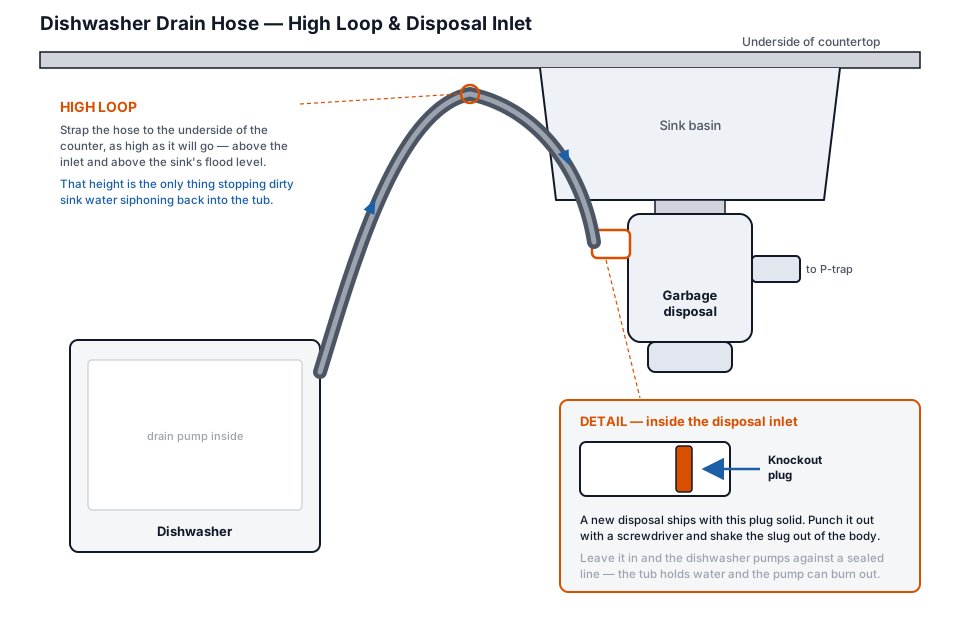
Every new garbage disposal ships with a knockout plug — a molded plastic disc cast into the dishwasher inlet on the side of the unit.
It’s there on purpose. Plenty of installations don’t connect a dishwasher at all: the kitchen has no dishwasher, or the dishwasher drains to its own standpipe or air gap rather than through the disposal. In those cases the inlet has to stay sealed, or you’d have an open hole spraying food waste under the sink.
So the manufacturer ships it closed and leaves it to the installer to open it when a dishwasher is being connected. InSinkErator, Badger, Moen, Waste King, Whirlaway — all of them do this. It isn’t a defect and it isn’t brand-specific.
The failure is that the plug isn’t visible once the disposal is mounted. You connect the dishwasher hose to the inlet, tighten the clamp, and everything looks perfectly correct from the outside. The disc is an inch inside the fitting where nobody sees it.
How to Confirm This Is Your Problem
The pattern is what gives it away.
The dishwasher drained fine before the disposal was replaced. That’s the strongest signal. A pump doesn’t coincidentally fail the same week you change a disposal.
The dishwasher won’t drain at all — not slowly, not partially. A blocked filter or a partial clog gives you slow drainage. A knockout plug gives you nothing, because the drain path is sealed shut.
The disposal itself works perfectly. Sink drains, disposal grinds, no backup on that side.
You may hear the drain pump running. The pump is fine. It’s trying to push water into a dead end.
Some dishwashers throw a drain-related error code after the cycle. On many models that’s a flashing light or a beep pattern rather than a code on a display.
Two other things worth ruling out first, both of which take a minute:
- Is the disposal full? Run it for thirty seconds with cold water. A disposal packed with waste backs water up into the dishwasher.
- Is the drain hose kinked? Look under the sink and follow the hose. Installing a disposal means moving that hose around, and it’s easy to leave it pinched behind the new unit.
If neither of those is it, and the dishwasher worked before the swap, it’s the plug.
Removing the Knockout Plug
Turn off power to the disposal first. Unplug it, or switch off the breaker if it’s hardwired. Do not skip this.
Do it before you mount the disposal if you can. If you’re reading this mid-installation, knock the plug out while the unit is still sitting on the counter. It’s vastly easier than working upside down under a sink, and you can shake the disc out in two seconds. If the disposal is already mounted, you can still do it in place — it’s just less pleasant.
Here’s the sequence:
1. Disconnect the dishwasher hose from the disposal inlet. Loosen the hose clamp and pull the hose off. Have a towel ready; there’s usually some water in it.
2. Look into the inlet. Shine a flashlight in. If you see a flat plastic disc about an inch in, that’s your problem confirmed.
3. Set a flathead screwdriver against the center of the plug. Use a screwdriver that fits well inside the inlet — a long one gives you better control.
4. Tap the screwdriver with a hammer. Firm, controlled taps. Not full swings. The plug will crack loose and drop into the grinding chamber. You’ll feel it give way.
5. Now get the disc out. This is the step people skip, and it matters.
Do Not Leave the Plug Inside
The knocked-out disc is now loose inside the disposal, and it has to come out.
If you leave it in there, it rattles around every time the disposal runs. It can wedge between the impellers and the grind ring, jam the motor, and leave you with a disposal that hums and won’t turn — which is a whole separate repair, and an infuriating one when you caused it yourself an hour earlier.
To retrieve it, reach in from the top of the disposal through the sink drain opening with needle-nose pliers. Power off, and never put your hand in without confirming that. Use a flashlight. The disc is usually sitting flat in the bottom of the chamber.
If you can’t reach it from above, and the disposal isn’t mounted yet, just turn the unit over and shake it out.
6. Confirm the inlet is clear. Look through the inlet with a flashlight — you should see straight into the grinding chamber with nothing blocking it.
7. Reconnect the dishwasher hose and tighten the clamp. Not gorilla-tight; snug enough not to leak.
8. Run the dishwasher on a short cycle and watch under the sink for leaks at the connection.
While You’re Under There: The High Loop
Since you already have the hose off, take thirty seconds to check this — it prevents a different problem that looks similar.
The dishwasher drain hose should rise up and attach high under the countertop before dropping down to the disposal. That high loop is what stops dirty sink water from siphoning backward into the dishwasher.
If the hose runs flat along the bottom of the cabinet, strap it up under the counter with a zip tie or a clamp. It costs nothing and it’s required by code in most places.
Some jurisdictions require an air gap — the small chrome cylinder that sits on the countertop behind the faucet — instead of a high loop. If you have one and the dishwasher isn’t draining, pop the cap off and check it for debris. Air gaps clog, and a clogged air gap gives you exactly the same standing water.
Tools and Parts
You almost certainly have everything already.
- Flathead screwdriver
- Hammer
- Needle-nose pliers
- Flashlight
- Towel and a small bucket
A sturdy flathead screwdriver is what actually knocks the plug through — this is the one job where the cheap wide-blade one in the drawer beats a precision set — and a pair of needle-nose pliers will fish the loose slug back out of the grinding chamber once it drops.
If the hose was damaged during the disposal swap, or it’s old and stiff enough that it cracked when the installer bent it out of the way, a drain hose kit is the fix, and it’s worth keeping a few stainless clamps on hand because the spring clamps that come off a disposal swap rarely reseat properly. Homes in jurisdictions that require one may also need the air gap on the sink deck replaced if it was disturbed — a clogged air gap produces symptoms nearly identical to a plugged inlet.
And if the disposal itself hasn’t been bought yet, it’s worth knowing that most units ship with this plug installed, not removed. It isn’t a defect and it isn’t specific to any brand — it’s there so the unit can be installed without a dishwasher at all.
If It Still Won’t Drain
Knocked the plug out, retrieved the disc, and you’re still looking at standing water? Work down this list.
Check the dishwasher filter. It may have been marginal already and the standing water finished it off. Twist the cylindrical filter out of the tub floor and clean it.
Check the disposal inlet again. Occasionally a fragment of the plug stays wedged in the inlet after the main disc breaks free.
Check the drain hose for a clog. Pull it off at the disposal end, put a bucket underneath, and see whether water runs out.
Check the air gap if you have one.
Test the drain pump. If everything upstream is clear, listen at the lower front panel during the drain portion of the cycle. A hum with no water movement points at a jammed or failed pump.
Bottom Line
If your dishwasher stopped draining right after a new garbage disposal went in, don’t start pulling the dishwasher apart. Pull the drain hose off the disposal inlet and look inside with a flashlight.
Knock the plug through with a screwdriver and a hammer — then get the disc out of the chamber before you run anything. Leaving it in there turns a ten-minute fix into a jammed disposal.
Keep Reading
- Dishwasher not draining? Work through this in order — if the timing doesn’t line up with a disposal swap, start here instead: filter, sump, hose, pump
- Washer not draining? Here’s how to fix it — the same diagnostic logic on a different machine
Common Questions
Do all garbage disposals have a knockout plug?
Yes, effectively all new residential units ship with the dishwasher inlet sealed. It's an installer step, not a defect.
Can I remove the plug without disconnecting the dishwasher hose?
No. The plug sits inside the inlet, behind where the hose attaches. The hose has to come off.
What if I already ran the dishwasher several times?
No harm done. The pump was pushing against a closed port, which it's designed to survive. Bail the standing water out, clear the plug, and carry on.
I knocked it out but can't find the disc.
Check the bottom of the grinding chamber with a flashlight — it usually sits flat and blends in. If it truly isn't there it may have gone down the drain line, which is generally harmless but worth watching for a slow drain.
Is this something a plumber should have caught?
Yes, and most do. It's still one of the most common callbacks on a disposal installation, precisely because everything looks correct from outside.
Does this apply to a new dishwasher too?
Same principle, other direction. If you install a new dishwasher onto an existing disposal that never had one connected, that disposal's plug is still in place and needs to come out.