A dryer that squeals, chirps, or rumbles is telling you something specific: a part that’s supposed to roll is now dragging. It’s a mechanical wear problem, not an electrical one, and it’s one of the most satisfying DIY repairs on the appliance list — the parts are cheap, the job is mostly screws, and the noise disappears completely. On the most common dryer platform in America, a single repair kit contains every part that wears out, which is why this repair is so often a one-trip job.
The catch is that four different parts make four different noises, and buying the wrong one means opening the dryer twice. Here’s how to tell them apart.
What the Noise Tells You
| Sound | Most likely cause |
|---|---|
| High squeal that fades as it warms up | Dry drum rollers |
| Steady squeal that never goes away | Idler pulley |
| Deep rumble or grinding, louder with a full load | Drum rollers, badly worn |
| Rhythmic thumping, once per drum rotation | Belt with a flat spot or a bad splice |
| Scraping metal on metal | Drum sliding on the bulkhead, or a foreign object |
| Squeal only on startup, then quiet | Rollers with flat spots |
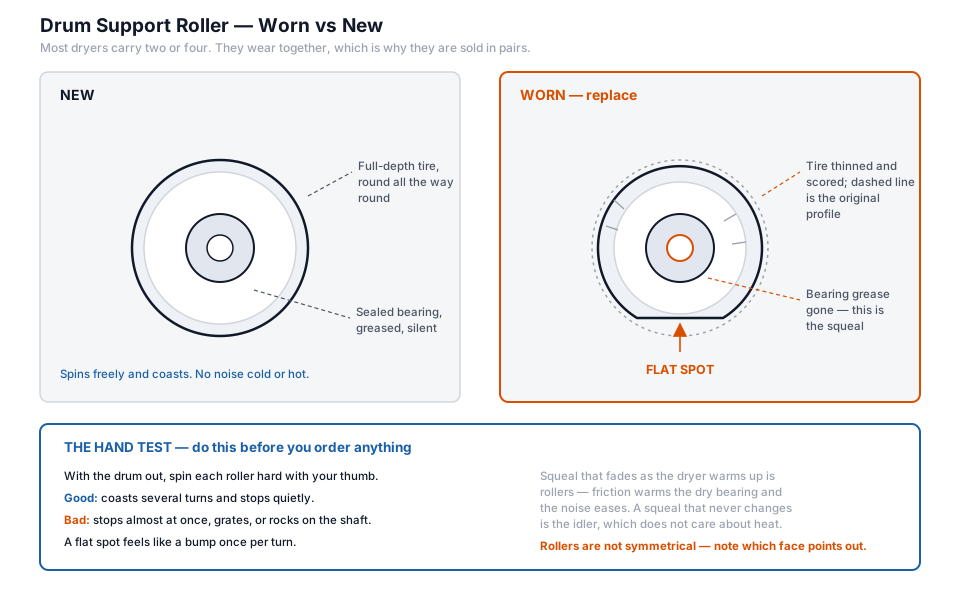
The “quiet once it warms up” detail is a genuinely useful clue. Roller bearings that have lost their grease squeal when cold, then the friction warms them and the noise eases. That’s rollers, not the idler — the idler doesn’t care about temperature.
Rule out the easy one first: a scraping sound is often a coin, a bra underwire, or a screw that worked its way past the drum seal and is now trapped between the drum and the housing. Reach through the lint trap opening with a flashlight and a magnet before you take anything apart.
The Parts and What They Do
Drum rollers (also called support rollers or wheels) sit under or behind the drum and carry its weight. Most dryers have two or four. They’re plastic wheels on a steel shaft with a sealed bearing, and after ten or fifteen years the bearing dries out and the wheel develops flat spots.
The idler pulley keeps tension on the drive belt. It spins constantly whenever the dryer runs. Its bearing fails the same way, and because it always turns at high speed, it usually squeals steadily rather than intermittently.
The drive belt is a thin ribbon that wraps around the drum and drives it from the motor. Belts fray, glaze, and eventually snap. A dryer whose drum won’t turn at all — motor runs, drum sits still — has almost certainly broken its belt.
The rear drum bearing is a shaft-and-socket or ball-and-socket at the back center of the drum on some designs. When the plastic socket wears through, you get a deep grinding noise.
Replace All of It at Once
This is the single most useful piece of advice in this article, and it’s why manufacturers sell these as kits.
The parts wear at roughly the same rate, and the labor is entirely in getting the dryer open. Once the cabinet is apart, swapping the belt takes two minutes and the rollers take ten. If you replace only the squealing roller, there’s a very good chance you’ll be doing this again next year for the idler.
Buy the kit. It costs a little more than a single part and saves you the second teardown.
Repair Kits by Brand
Whirlpool / Kenmore / Maytag / Roper / Estate / Amana — 29-inch models
This is the most common dryer platform in America, and the parts are famously cheap. The complete kit is part 4392067, which contains the belt (341241), two drum rollers (349241T), and the idler pulley (691366) — and that kit number is the single most useful thing to search if your dryer is one of these. Everything that wears out on this platform is in the one box.
You can buy the pieces individually if you’ve already replaced part of the set — the drum rollers sell in pairs, the belt on its own, and the idler pulley separately. But once the cabinet is open you’ve already paid the real cost of this repair in labor, and the parts you didn’t replace are exactly as old as the one that failed.
Samsung dryers use a different arrangement, with the idler and rollers specific to the series, so you’ll want to match a roller and idler kit to your exact model rather than trusting a universal listing. LG works the same way — roller and belt kits are sold by series, not across the range.
GE dryers commonly need the idler and the drum bearing slide kit together, which is why the idler and belt kits for these are usually bundled that way; if you replace the idler alone on a GE and the noise only half goes away, the slides were the other half of it. Frigidaire and Electrolux drums ride on rollers that tend to go together rather than one at a time, so roller kits for these come in sets.
One tool note before you start: most dryer cabinets are held together with 1/4” and 5/16” hex screws, and a nut driver set in those two sizes turns a knuckle-skinning afternoon into a straightforward one. A socket on a ratchet won’t reach into most of these cabinets.
Before you buy anything, verify the part number against your own model.
4392067 covers an enormous number of 29-inch Whirlpool-platform dryers, but "an enormous number" is not "all of them" — and Kenmore units in particular were built by several different manufacturers over the years, so the badge on the front tells you very little. Put your full model number into searspartsdirect.com and confirm the part it returns matches what you're about to order.
On a dryer the model sticker is usually inside the door opening, on the rim behind the door, or on the back panel near the top.
Doing the Job
Roughly ninety minutes the first time, half that once you’ve done one. Unplug the dryer. If it’s gas, shut off the gas valve too.
Getting in. On most top-load-style dryers, pop the top: slide a putty knife into the seam at the front corners, push in to release the spring clips, and lift the top like a car hood. Then remove the two screws holding the front panel, disconnect the door switch wire, and lift the front panel off. The drum is now exposed.
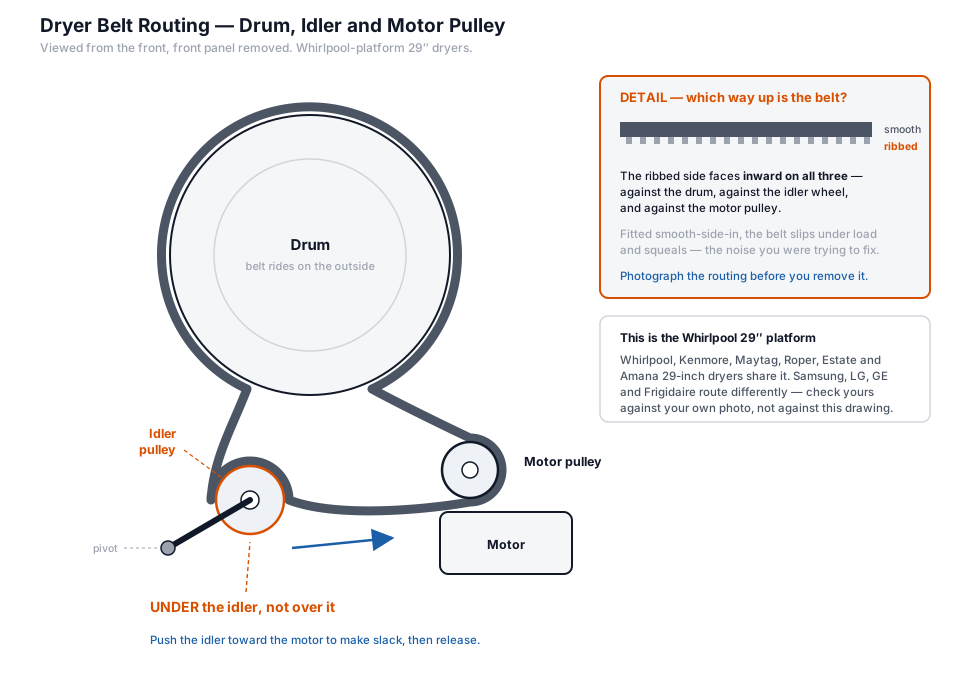
Note how the belt runs before you remove anything. Take a photo with your phone. The routing around the motor pulley and idler is the one part people get wrong, and the photo saves you.
Lift the drum out. Release the belt tension by pushing the idler pulley toward the motor, slip the belt off, and lift the drum forward and out.
Swap the parts. Rollers usually come off with a tri-ring clip or a single bolt. Note which way the wheel faces — they’re not symmetrical. Clean the shafts before installing new wheels, and if the kit came with a small packet of grease, use it on the shaft, not the bearing.
The idler pulley on most Whirlpool-family dryers isn’t fastened at all — it sits in a slot and is held by belt tension. Lift the old one out, drop the new one in.
Reinstall. Set the drum back on the rollers, wrap the belt around the drum with the grooved side against the drum, route it around the motor pulley and idler exactly as in your photo, and reassemble.
Before you screw everything back together, plug it in and run it empty for ten seconds to confirm the noise is gone and the belt tracks properly. Much easier to fix now than after the cabinet is closed.
What Else Makes Noise
If you’ve replaced the rollers, belt, and idler and it’s still loud, check these.
The blower wheel. Lint and small objects get past the trap and rattle around in the blower housing. A coin in there sounds like a machine gun. The blower wheel can also crack loose from the motor shaft, which gives a wobbling, uneven rumble.
The motor bearings. Less common, but a motor with failed bearings whines continuously and won’t be helped by anything else you replace.
Loose feet. A dryer that isn’t level walks and bangs against the wall or the washer. Costs nothing to check.
The exhaust duct. A loose section of rigid duct behind the dryer rattles in sympathy with the drum. Sounds like it’s coming from inside the machine.
Bottom Line
Listen to the noise first — a squeal that fades as it warms is rollers, a squeal that never quits is the idler, a rhythmic thump is the belt.
Then buy the complete kit rather than the single part. The labor is in opening the dryer, and doing that twice for the sake of a few dollars is a bad trade.
Keep Reading
- Dryer not heating? Diagnose the element vs. the thermofuse — the other half of dryer repair, with part numbers by brand
- Whirlpool dryer thermofuse replacement (#3392519) — the specific part, step by step
- How to clean your dryer vent — worth doing while the cabinet is already open; a clogged vent is what blows thermofuses
- Where to buy appliance parts without getting burned — Amazon vs. local parts houses
Common Questions
Can I keep using a squealing dryer?
For a while, yes — a dry roller bearing is noisy long before it's dangerous. But a belt that's fraying will eventually snap, and a roller that seizes can score the drum. Fix it within a few weeks, not a few years.
How long do drum rollers last?
Ten to fifteen years typically. Heavy use, or a dryer that runs with an overloaded drum, shortens that considerably.
My dryer runs but the drum doesn't turn.
Broken belt, nearly always. The motor still runs because it isn't loaded. Same teardown as above.
Is this repair worth it on an old dryer?
Almost always. This is a low-cost parts repair on a machine that's otherwise simple and long-lived. Dryers routinely run twenty years with a roller kit or two along the way.
Should I lubricate the rollers instead of replacing them?
It buys you a few months at best. The bearings are sealed and once the seal fails, contaminated grease grinds the bearing down. Replace them.